Friday, December 28, 2012

Redirect Your Blog to .com

  1. Find the control panel on your domain registrar’s website, and locate your DNS (Domain Name System) settings. In order to link your blog to your custom domain, follow the instructions below to enter your "CNAME" and "A-records."
    CNAME
    Add two CNAME records. For the first CNAME, where it says Name, Label or Host enter "www" and where it says Destination, Target or Points To enter "ghs.google.com" . For the second CNAME, enter "2bcfmxj2hpem" as the Name and
    "gv-gnxhc2g7kpcxiya4w7vcjapbcwofi2gqonf2oegvihjn74w6fxvq.domainverify.googlehosted.com." as the Destination. See our detailed instructions on providing CNAMEs for various registrars. If yours isn't listed, or if you run into other difficulties, contact your registrar directly and they can help you out.
    A-records (optional)
    The following action links your naked domain (example.com) to your actual site (www.example.com). If you skip this step, visitors who leave off the "www" will see an error page.
    Enter your domain name in the format example.com, and list the I.P. addresses shown below in the "A" section. You'll need to create four separate A-records which point to four different Google IPs.
    216.239.32.21
    216.239.34.21
    216.239.36.21
    216.239.38.21
  2. Update your Blogger settings
    Before you move onto this step, wait about an hour for your DNS settings to activate. If you attempt to change the publishing settings before the DNS changes activate, then we'll let you know with a warning message.
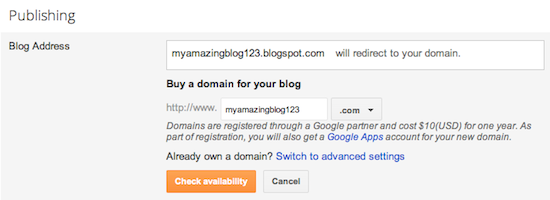
    Now it’s time to make sure Blogger knows about your custom domain so that Google can direct readers to your blog. Just head back to Blogger and update the information on your Settings | Basic tab. Find the area for "Publishing," and click the link to add a custom domain.
    Add a custom domain
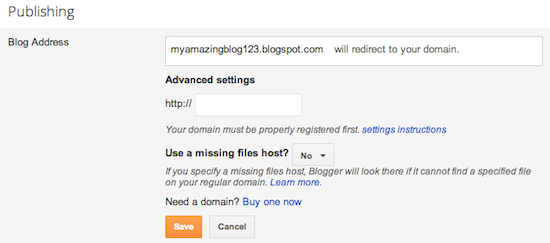
    Then, click on "Switch to advanced settings."
    Advanced Settings
    Enter in the URL for your custom domain in the text box provided, and click Save. That’s it! Your blogspot.com address will soon redirect to your new custom domain -- be patient, as it might take up to 24 hours for the redirect to start working.
    Enter URL and save
    Congratulations, you’re all set!

    Source: http://www.blogger.com/custom-domain-instructions.g?tokenName=2bcfmxj2hpem&tokenAddress=gv-gnxhc2g7kpcxiya4w7vcjapbcwofi2gqonf2oegvihjn74w6fxvq.domainverify.googlehosted.com.&domain=www.tipsoftechnology.com

Auto Password / Unique id Generation

Overview:  
You might have come across sites, that generate a unique username or a randomly generated password for you, this script show you how to do the same with PHP.
It is a common practice for websites to issue you a randomly generated password and I will show how this can be done via PHP, this concept can also be used to generate random passwords, you can generated a new password via this method for a user that might have lost his password and email this new password to him.

Okay enough of talk now, I will show you how we will proceed to accomplish it, I will be using PHP built in functions uniqid and crypt to accomplish the task.

What basically ëuniqidí does is it generated a UNIQUE id based on the current time in microseconds and we use the ëcryptí function to do a one way encryption of the same.

The code given below will generate a random 10 digit id that can be used as a unique id or password. 


random_id.php

<?PHP
//set the random id length
$random_id_length = 10;

//generate a random id encrypt it and store it in $rnd_id
$rnd_id = crypt(uniqid(rand(),1));

//to remove any slashes that might have come
$rnd_id = strip_tags(stripslashes($rnd_id));

//Removing any . or / and reversing the string
$rnd_id = str_replace(".","",$rnd_id);
$rnd_id = strrev(str_replace("/","",$rnd_id));

//finally I take the first 10 characters from the $rnd_id
$rnd_id = substr($rnd_id,0,$random_id_length);

echo "Random Id: $rnd_id";
?>

Make WAMPServer Run Automatically on System Start-up

 As with all web developers, it’s always important to test your projects locally before putting it out there for the entire web community to see. One must-have developer tool for this purpose is WAMPServer. We’ve all wished it’s automatically up and running when we need it. These easy steps will help you automate WAMPServer to run on system start-up.

For those unfamiliar with WAMPServer, it is a development package that lets you run web development projects locally. WAMP stands for Windows, Apache, MySQL, PHP/Perl/Python. It’s basically four programs packaged to work as one. WAMP basically turns any Windows PC into a localized web server. The Linux counterpart is called LAMP, obviously.

Once WAMPServer is installed in your PC, you’ll be able to test your web projects before putting it into the live environment. But I always found it a hassle to manually start the service every time I need it. With these easy steps, you’ll never have to manually start WAMPServer ever again.

   From All Programs, go to the Accessories folder and select Run. A shortcut for this is Windows Key + R.

   Type services.msc and click OK. This will open the Services Management Console.
   
   In Services Management Console, look for ‘wampapache‘. The Startup Type will be set to ‘Manual’ and so we’ll need to change this to ‘Automatic‘. Right-click on it and select ‘Properties’.

    In the properties window, select ‘Automatic‘ for ‘Startup Type‘. Then, click on ‘Apply‘ and then close the property window. We’ve just set the Apache side of WAMP to run automatically on startup.

   
   Still in Services Management Console, look for ‘wampmysqld‘. We’ll also set this to automatic, so right-click on it and select ‘Properties‘.

   
    Select ‘Automatic‘ for ‘Startup Type’. Click on ‘Apply’ and then close the Properties and Services Management Console.
  
   Restart your machine/PC.
   After the restart, log back in and open a browser. Type localhost (127.0.0.1) in the address bar. localhost is the address for the local installation of WAMPServer in your PC. If the Server Configuration page for WAMPServer loads – Congratulations, you’ve just successfully automated your WAMPServer startup.

Page Rank

Check Page Rank of your Web site pages instantly:

This page rank checking tool is powered by Page Rank Checker service

Facebook

Followers