Tuesday, April 30, 2013

Fresh from Motorola: RAZR D1 and RAZR D3 smartphones

Motorola is well-know for it smartphones, and speaking of which, it seems that this phone manufacturer has announced two new RAZR smartphones for Brazilian market.


The first model is called RAZR D1 and it’s powered by 1GHz processor and 1GB of RAM. As for the touchscreen, this device uses 3.5-inch display, and it comes with 5 Megapixel camera with Back Side Illumination sensor and HDR function. We also have to notice that Motorola RAZR D1 will come with optional support for analog and digital TV reception. Second model, RAZR D3 comes with 4-inch touchscreen display, and it’s protected with Corning’s Gorilla Glass. As for the hardware, this model uses dual-core 1.2GHz processor and 1GB of RAM. Additional specs include 8 Megapixel BSI rear camera with Flash and HDR, and 1.2 Megapixel front camera for video calls. Both RAZR D1 and RAZR D3 come with 4GB of internal storage, but you can expand it up to 32GB thanks to the microSD card. In addition, both devices come with FM radio.

There are two versions of these phones: a single SIM and a dual SIM, and RAZR D1 should cost you $277, while the RAZR D3 is priced at $403.

Source: http://www.gadgetlite.com/2013/04/18/fresh-from-motorola-razr-d1-and-razr-d3-smartphones/#more-37429

ThinkPad T431s: Latest notebook from Lenovo

If you’re familiar with Lenovo and its ThinkPad line, you should probably know that Lenovo has released its latest addition to the ThinkPad line.


ThinkPad T431s is the latest notebook from Lenovo, and according to the reports, this is the lightest T model, and it weighs 1.63kg while measuring only 20.6mm in thickness. As for the hardware, this notebook is powered by Intel’s 3rd gen Core Ivy Bridge processor up to i7-3687U, but you can also get Core i5-3337U or i5-3437U instead.


This device comes with 4GB of RAM that is soldered to the mainboard, but you can upgrade it up to 12GB. ThinkPad T431s uses integrated Intel HD graphics chip and it comes with 14-inch 1600×900 display with 250 nits brightness. Regarding the storage space, this device comes with up to 1TB 5400RPM hard drive or 256GB SSD, but there’s also a SD/SDHC/SDXC card reader available as well.


ThinkPad T431s comes with smooth 5-button TouchPad with glass surface and multitouch, and the keyboard is equipped with backlight. Other specs include 720p HD webcam, WiFi 802.11n, USB 3.0 ports and optional WWAN 3G/4G mobile broadband support. Optional features include built-in fingerprint reader and Smart Card Reader, as well as Hardware Password Manager suite that encrypts your hard drives.


ThinkPad T431s is an impressive notepad, and as for the price, the starting price of this model is $949.

Source: http://www.gadgetlite.com/2013/04/19/thinkpad-t431s-latest-notebook-from-lenovo/#more-37434

Latest 10-port USB hub from Satechi

Sometimes you can simply run out of free USB ports on your computer, and this is when USB hub might come in handy, and if you’re looking for a USB hub, today we have the perfect model for you.


Satechi has released its new USB hub, and this hub comes with ten ports and three switches. This hub comes with nine USB 3.0 ports, and there’s even one port dedicated to iPad charging. This device will be perfect if you have several devices such as joystick, pinter, smartphone or tablet, that you need to connect to your computer or a laptop.

Best part about this USB hub is that all USB ports are divided into three groups, and instead of unplugging every single USB device from that group, you can simply press one of the three switches on the right and turn off the entire group of devices. Of course, each group comes with a LED indicator, so you can easily keep track on devices you’re currently using.

This USB hub from Satechi sounds great, and if you need 10-port USB hub, you can get this one for $59.99.

Source:http://www.gadgetlite.com/2013/04/23/latest-10-port-usb-hub-from-satechi/#more-37468

FujiFilm FinePix S8400W WiFi digital camera

FujiFilm is well-known for its cameras, and speaking of which, this famous digital camera manufacturer has decided to expand its S Series with a new model.


FinePix S8400W comes with 16 Megapixel BSI CMOS image sensor and with ISO sensitivity ranging from 64 to 12,800. This camera uses 44x optical zoom thanks to the Fujinon lens, and you can even double the zoom using the Intelligent Digital Zoom super resolution technology.


There’s also an Optical Image Stabilization system that will reduce the blur caused by camera shake. FinePix S8400W is a fast camera and it features autofocus speed of 0.3 seconds, start-up time of 1.0 second, a 0.5 second interval between shots, and it can even make continuous shots at 10fps in full resolution. We also have to point out that FinePix S8400W comes with WiFi and you can connect your camera to your smartphone or tablet using the free FujiFilm Camera application in order to transfer your files easily. Additional features include a built-in Electronic viewfinder (EVF) and a 3-inch LCD display. As for the battery, FinePix S8400W uses four AA alkaline batteries that can provide you with enough power to take 300 shots.


FinePix S8400W has a lot to offer, and as for the availability, we should see this camera available for sale this May for $349.95.
Source:http://www.gadgetlite.com/2013/04/25/fujifilm-finepix-s8400w-wifi-digital-camera/#more-37500

Officially announced: Samsung Galaxy Tab 3

We had a lot of leaked and speculated information regarding Samsung Galaxy Tab 3, and now, we’re proud to inform you that Samsung Galaxy Tab 3 has been officially announced.


Samsung Galaxy Tab 3 comes with 7-inch 1024×600 169 PPI display. As for other hardware, this tablet uses 1.2 GHz dual-core processor and 1GB or RAM. Regarding the storage space, this tablet comes with 8GB or 16GB of built-in memory, but there’s also a microSD card slot, so you you can easily expand it.


In addition, Samsung Galaxy Tab 3 comes with 3MP main camera and 1.3MP front camera for video calls. Regarding the operating system, Samsung Galaxy Tab 3 runs on Android 4.1 Jelly Bean mobile operating system.

Samsung Galaxy Tab 3 is almost identical to its predecessor, although it has few enhanced hardware specs, so you might think twice before upgrading from your Galaxy Tab 2. As for the availability, we should see WiFi-only model in May, while the 3G version should be released in June. So far, we have no information regarding the price.


Source: http://www.gadgetlite.com/2013/04/30/officially-announced-samsung-galaxy-tab-3/#more-37609

Wednesday, January 23, 2013

Link Building Service

Link building is the most improtant part on search engine optimization (SEO) for any web sites. you can promote your web site. You can get Link Building Service by indexing on google as you want. for this process you can visit our page PAGE RANK >> Promot Web page >> SEO ping Service at the top of page on this site or visit this page
http://www.tipsoftechnology.com/p/seo.html 

For building your back links you can post your page link to the posts on other web sites giving link of your Web site. 
Follow The steeps if you need to make back link:
  • Search the pages on google that content matching on your website
  • Open the site you have choosen
  • Comment on the post in min 100 words
  • Give the link of your site 
 Further you can submit your page for web submission on many search engines using the banner Web Submission banner right side of this page.


Pen Spy Camera DVR 2GB

This working pen works as audio recorder as well as spy camera. It can record for two hours on a single charge. It works as audio recorder as well as spy camera. It can record for two hours on a single charge. This working pen writes like a normal pen. No additional drivers or outside power source are needed to operate. It will charge plugged into the wall and charge when it is plugged into the computer.  
The spy pen is the perfect camera for "body worn" application. Just click  any ball point pen if you want to start recording.It  can record for two hours on a single battery charge. You Can store Recordings via  USB 2.0 to your PC. You can even use it as a thumb drive to move files from one computer to another. 
This working pen will hold 2 GB of data. This is a working ball point pen with exchangeable standard ball-point refill. This working pen is one of the first mini DVRs with a ball-point pen shape that is both a video and audio recorder in the world, which has a covert mini DVR in the pen. 
Spy Camera lens this pen is located 1/4 inch from top of this working pen on same side as the pocket clip. So, when clipped in a shirt pocket, the lens is above the pocket facing out. It has a highly sensitive microphone with range of 15 feet, can record the audio clearly. It is suitable for any computer and other equipment with a standard USB 2.0 port. There is no need for drivers or external power supply.


Features:
  • Fully functional writing pen
  • Full color camera
  • One button recording
  • Rechargeable Li-Ion battery records up to 2 hours on a single charge
  • Recording format is in AVI
  • Prompt play and recorder speed plays at 900kb/700kb
  • Camera is 300,000 pixels
  • Resolution of 352 x 288
  • Records at 16 frames per second
  • Microphone records audio clearly in the range of 15 feet
  • Suitable for any computer with standard 2.0 USB port
  • Support Windows 98/98SE/2000/XP/VISTA OS/ Linux
  • Built-in 2GB flash memory
  • Includes viewing software CD
  • Includes AC adaptor for charging
  • Includes USB adaptor
  • Includes gift box

Friday, December 28, 2012

Redirect Your Blog to .com

  1. Find the control panel on your domain registrar’s website, and locate your DNS (Domain Name System) settings. In order to link your blog to your custom domain, follow the instructions below to enter your "CNAME" and "A-records."
    CNAME
    Add two CNAME records. For the first CNAME, where it says Name, Label or Host enter "www" and where it says Destination, Target or Points To enter "ghs.google.com" . For the second CNAME, enter "2bcfmxj2hpem" as the Name and
    "gv-gnxhc2g7kpcxiya4w7vcjapbcwofi2gqonf2oegvihjn74w6fxvq.domainverify.googlehosted.com." as the Destination. See our detailed instructions on providing CNAMEs for various registrars. If yours isn't listed, or if you run into other difficulties, contact your registrar directly and they can help you out.
    A-records (optional)
    The following action links your naked domain (example.com) to your actual site (www.example.com). If you skip this step, visitors who leave off the "www" will see an error page.
    Enter your domain name in the format example.com, and list the I.P. addresses shown below in the "A" section. You'll need to create four separate A-records which point to four different Google IPs.
    216.239.32.21
    216.239.34.21
    216.239.36.21
    216.239.38.21
  2. Update your Blogger settings
    Before you move onto this step, wait about an hour for your DNS settings to activate. If you attempt to change the publishing settings before the DNS changes activate, then we'll let you know with a warning message.
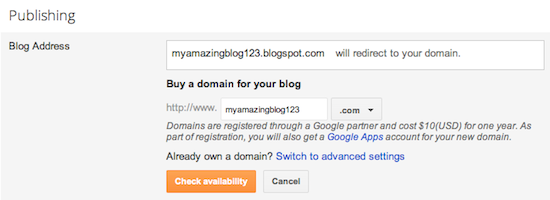
    Now it’s time to make sure Blogger knows about your custom domain so that Google can direct readers to your blog. Just head back to Blogger and update the information on your Settings | Basic tab. Find the area for "Publishing," and click the link to add a custom domain.
    Add a custom domain
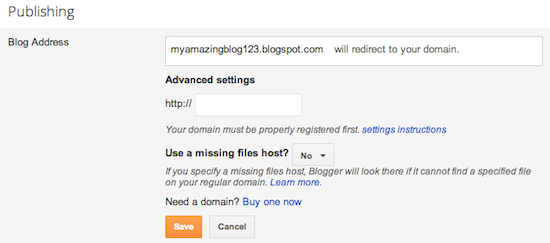
    Then, click on "Switch to advanced settings."
    Advanced Settings
    Enter in the URL for your custom domain in the text box provided, and click Save. That’s it! Your blogspot.com address will soon redirect to your new custom domain -- be patient, as it might take up to 24 hours for the redirect to start working.
    Enter URL and save
    Congratulations, you’re all set!

    Source: http://www.blogger.com/custom-domain-instructions.g?tokenName=2bcfmxj2hpem&tokenAddress=gv-gnxhc2g7kpcxiya4w7vcjapbcwofi2gqonf2oegvihjn74w6fxvq.domainverify.googlehosted.com.&domain=www.tipsoftechnology.com

Auto Password / Unique id Generation

Overview:  
You might have come across sites, that generate a unique username or a randomly generated password for you, this script show you how to do the same with PHP.
It is a common practice for websites to issue you a randomly generated password and I will show how this can be done via PHP, this concept can also be used to generate random passwords, you can generated a new password via this method for a user that might have lost his password and email this new password to him.

Okay enough of talk now, I will show you how we will proceed to accomplish it, I will be using PHP built in functions uniqid and crypt to accomplish the task.

What basically ëuniqidí does is it generated a UNIQUE id based on the current time in microseconds and we use the ëcryptí function to do a one way encryption of the same.

The code given below will generate a random 10 digit id that can be used as a unique id or password. 


random_id.php

<?PHP
//set the random id length
$random_id_length = 10;

//generate a random id encrypt it and store it in $rnd_id
$rnd_id = crypt(uniqid(rand(),1));

//to remove any slashes that might have come
$rnd_id = strip_tags(stripslashes($rnd_id));

//Removing any . or / and reversing the string
$rnd_id = str_replace(".","",$rnd_id);
$rnd_id = strrev(str_replace("/","",$rnd_id));

//finally I take the first 10 characters from the $rnd_id
$rnd_id = substr($rnd_id,0,$random_id_length);

echo "Random Id: $rnd_id";
?>

Make WAMPServer Run Automatically on System Start-up

 As with all web developers, it’s always important to test your projects locally before putting it out there for the entire web community to see. One must-have developer tool for this purpose is WAMPServer. We’ve all wished it’s automatically up and running when we need it. These easy steps will help you automate WAMPServer to run on system start-up.

For those unfamiliar with WAMPServer, it is a development package that lets you run web development projects locally. WAMP stands for Windows, Apache, MySQL, PHP/Perl/Python. It’s basically four programs packaged to work as one. WAMP basically turns any Windows PC into a localized web server. The Linux counterpart is called LAMP, obviously.

Once WAMPServer is installed in your PC, you’ll be able to test your web projects before putting it into the live environment. But I always found it a hassle to manually start the service every time I need it. With these easy steps, you’ll never have to manually start WAMPServer ever again.

   From All Programs, go to the Accessories folder and select Run. A shortcut for this is Windows Key + R.

   Type services.msc and click OK. This will open the Services Management Console.
   
   In Services Management Console, look for ‘wampapache‘. The Startup Type will be set to ‘Manual’ and so we’ll need to change this to ‘Automatic‘. Right-click on it and select ‘Properties’.

    In the properties window, select ‘Automatic‘ for ‘Startup Type‘. Then, click on ‘Apply‘ and then close the property window. We’ve just set the Apache side of WAMP to run automatically on startup.

   
   Still in Services Management Console, look for ‘wampmysqld‘. We’ll also set this to automatic, so right-click on it and select ‘Properties‘.

   
    Select ‘Automatic‘ for ‘Startup Type’. Click on ‘Apply’ and then close the Properties and Services Management Console.
  
   Restart your machine/PC.
   After the restart, log back in and open a browser. Type localhost (127.0.0.1) in the address bar. localhost is the address for the local installation of WAMPServer in your PC. If the Server Configuration page for WAMPServer loads – Congratulations, you’ve just successfully automated your WAMPServer startup.

Page Rank

Check Page Rank of your Web site pages instantly:

This page rank checking tool is powered by Page Rank Checker service

Facebook

Followers