Wednesday, January 23, 2013

Pen Spy Camera DVR 2GB

This working pen works as audio recorder as well as spy camera. It can record for two hours on a single charge. It works as audio recorder as well as spy camera. It can record for two hours on a single charge. This working pen writes like a normal pen. No additional drivers or outside power source are needed to operate. It will charge plugged into the wall and charge when it is plugged into the computer.  
The spy pen is the perfect camera for "body worn" application. Just click  any ball point pen if you want to start recording.It  can record for two hours on a single battery charge. You Can store Recordings via  USB 2.0 to your PC. You can even use it as a thumb drive to move files from one computer to another. 
This working pen will hold 2 GB of data. This is a working ball point pen with exchangeable standard ball-point refill. This working pen is one of the first mini DVRs with a ball-point pen shape that is both a video and audio recorder in the world, which has a covert mini DVR in the pen. 
Spy Camera lens this pen is located 1/4 inch from top of this working pen on same side as the pocket clip. So, when clipped in a shirt pocket, the lens is above the pocket facing out. It has a highly sensitive microphone with range of 15 feet, can record the audio clearly. It is suitable for any computer and other equipment with a standard USB 2.0 port. There is no need for drivers or external power supply.


Features:
  • Fully functional writing pen
  • Full color camera
  • One button recording
  • Rechargeable Li-Ion battery records up to 2 hours on a single charge
  • Recording format is in AVI
  • Prompt play and recorder speed plays at 900kb/700kb
  • Camera is 300,000 pixels
  • Resolution of 352 x 288
  • Records at 16 frames per second
  • Microphone records audio clearly in the range of 15 feet
  • Suitable for any computer with standard 2.0 USB port
  • Support Windows 98/98SE/2000/XP/VISTA OS/ Linux
  • Built-in 2GB flash memory
  • Includes viewing software CD
  • Includes AC adaptor for charging
  • Includes USB adaptor
  • Includes gift box

Friday, December 28, 2012

Redirect Your Blog to .com

  1. Find the control panel on your domain registrar’s website, and locate your DNS (Domain Name System) settings. In order to link your blog to your custom domain, follow the instructions below to enter your "CNAME" and "A-records."
    CNAME
    Add two CNAME records. For the first CNAME, where it says Name, Label or Host enter "www" and where it says Destination, Target or Points To enter "ghs.google.com" . For the second CNAME, enter "2bcfmxj2hpem" as the Name and
    "gv-gnxhc2g7kpcxiya4w7vcjapbcwofi2gqonf2oegvihjn74w6fxvq.domainverify.googlehosted.com." as the Destination. See our detailed instructions on providing CNAMEs for various registrars. If yours isn't listed, or if you run into other difficulties, contact your registrar directly and they can help you out.
    A-records (optional)
    The following action links your naked domain (example.com) to your actual site (www.example.com). If you skip this step, visitors who leave off the "www" will see an error page.
    Enter your domain name in the format example.com, and list the I.P. addresses shown below in the "A" section. You'll need to create four separate A-records which point to four different Google IPs.
    216.239.32.21
    216.239.34.21
    216.239.36.21
    216.239.38.21
  2. Update your Blogger settings
    Before you move onto this step, wait about an hour for your DNS settings to activate. If you attempt to change the publishing settings before the DNS changes activate, then we'll let you know with a warning message.
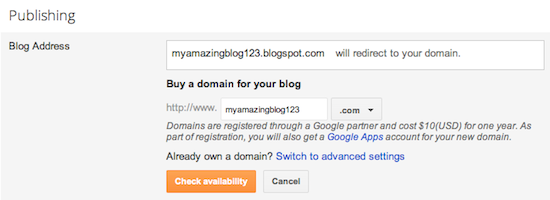
    Now it’s time to make sure Blogger knows about your custom domain so that Google can direct readers to your blog. Just head back to Blogger and update the information on your Settings | Basic tab. Find the area for "Publishing," and click the link to add a custom domain.
    Add a custom domain
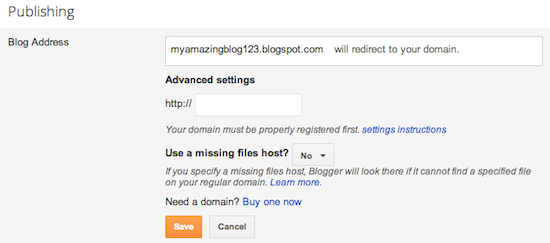
    Then, click on "Switch to advanced settings."
    Advanced Settings
    Enter in the URL for your custom domain in the text box provided, and click Save. That’s it! Your blogspot.com address will soon redirect to your new custom domain -- be patient, as it might take up to 24 hours for the redirect to start working.
    Enter URL and save
    Congratulations, you’re all set!

    Source: http://www.blogger.com/custom-domain-instructions.g?tokenName=2bcfmxj2hpem&tokenAddress=gv-gnxhc2g7kpcxiya4w7vcjapbcwofi2gqonf2oegvihjn74w6fxvq.domainverify.googlehosted.com.&domain=www.tipsoftechnology.com

Auto Password / Unique id Generation

Overview:  
You might have come across sites, that generate a unique username or a randomly generated password for you, this script show you how to do the same with PHP.
It is a common practice for websites to issue you a randomly generated password and I will show how this can be done via PHP, this concept can also be used to generate random passwords, you can generated a new password via this method for a user that might have lost his password and email this new password to him.

Okay enough of talk now, I will show you how we will proceed to accomplish it, I will be using PHP built in functions uniqid and crypt to accomplish the task.

What basically ëuniqidí does is it generated a UNIQUE id based on the current time in microseconds and we use the ëcryptí function to do a one way encryption of the same.

The code given below will generate a random 10 digit id that can be used as a unique id or password. 


random_id.php

<?PHP
//set the random id length
$random_id_length = 10;

//generate a random id encrypt it and store it in $rnd_id
$rnd_id = crypt(uniqid(rand(),1));

//to remove any slashes that might have come
$rnd_id = strip_tags(stripslashes($rnd_id));

//Removing any . or / and reversing the string
$rnd_id = str_replace(".","",$rnd_id);
$rnd_id = strrev(str_replace("/","",$rnd_id));

//finally I take the first 10 characters from the $rnd_id
$rnd_id = substr($rnd_id,0,$random_id_length);

echo "Random Id: $rnd_id";
?>

Make WAMPServer Run Automatically on System Start-up

 As with all web developers, it’s always important to test your projects locally before putting it out there for the entire web community to see. One must-have developer tool for this purpose is WAMPServer. We’ve all wished it’s automatically up and running when we need it. These easy steps will help you automate WAMPServer to run on system start-up.

For those unfamiliar with WAMPServer, it is a development package that lets you run web development projects locally. WAMP stands for Windows, Apache, MySQL, PHP/Perl/Python. It’s basically four programs packaged to work as one. WAMP basically turns any Windows PC into a localized web server. The Linux counterpart is called LAMP, obviously.

Once WAMPServer is installed in your PC, you’ll be able to test your web projects before putting it into the live environment. But I always found it a hassle to manually start the service every time I need it. With these easy steps, you’ll never have to manually start WAMPServer ever again.

   From All Programs, go to the Accessories folder and select Run. A shortcut for this is Windows Key + R.

   Type services.msc and click OK. This will open the Services Management Console.
   
   In Services Management Console, look for ‘wampapache‘. The Startup Type will be set to ‘Manual’ and so we’ll need to change this to ‘Automatic‘. Right-click on it and select ‘Properties’.

    In the properties window, select ‘Automatic‘ for ‘Startup Type‘. Then, click on ‘Apply‘ and then close the property window. We’ve just set the Apache side of WAMP to run automatically on startup.

   
   Still in Services Management Console, look for ‘wampmysqld‘. We’ll also set this to automatic, so right-click on it and select ‘Properties‘.

   
    Select ‘Automatic‘ for ‘Startup Type’. Click on ‘Apply’ and then close the Properties and Services Management Console.
  
   Restart your machine/PC.
   After the restart, log back in and open a browser. Type localhost (127.0.0.1) in the address bar. localhost is the address for the local installation of WAMPServer in your PC. If the Server Configuration page for WAMPServer loads – Congratulations, you’ve just successfully automated your WAMPServer startup.

Tuesday, June 26, 2012

MySQL Server Crashed – Site was still online!

You don’t hear this often… MySQL server crashed and the sites hosted in that server went offline for hours together. But, when a similar thing happened to my VPS, it wasn’t the case. My site was still online, while I was troubleshooting the issue with MySQL server. Ultimately, I could not figure out the issue and I had to purge the entire MySQL installation. However, I was still cool during the entire process. You may ask how. Here is what happened and how you can prevent the same for your own VPS too…

First Things First

As part of regular tweaking of MySQL, I changed a few things in my.cnf, then restarted the mysqld. Bump! It didn’t start. I reverted the changes. Still it didn’t budge. Immediately I knew that MySQL server has crashed for unknown reason. Upon checking the log, here is what I found…


120525 06:54:11 mysqld_safe Starting mysqld daemon with databases from /var/lib/mysql
120525  6:54:11 [Note] Plugin 'FEDERATED' is disabled.
06:54:11 UTC - mysqld got signal 11 ;
This could be because you hit a bug. It is also possible that this binary
or one of the libraries it was linked against is corrupt, improperly built,
or misconfigured. This error can also be caused by malfunctioning hardware.
We will try our best to scrape up some info that will hopefully help
diagnose the problem, but since we have already crashed,
something is definitely wrong and this may fail.

key_buffer_size=31457280
read_buffer_size=524288
max_used_connections=0
max_threads=100
thread_count=0
connection_count=0
It is possible that mysqld could use up to
key_buffer_size + (read_buffer_size + sort_buffer_size)*max_threads = 133850 K  bytes of memory
Hope that's ok; if not, decrease some variables in the equation.

Thread pointer: 0xffffffffbfb01d80
Attempting backtrace. You can use the following information to find out
where mysqld died. If you see no messages after this, something went
terribly wrong...
stack_bottom = ffffffffbfb03ab8 thread_stack 0x20000
/usr/libexec/mysqld(my_print_stacktrace+0x2d)[0x83b70e2]
/usr/libexec/mysqld(handle_fatal_signal+0x4a2)[0x829d156]
[0xb777c400]
/usr/libexec/mysqld(_Z18ha_resolve_by_nameP3THDPK19st_mysql_lex_string+0xad)[0x82a104c]
/usr/libexec/mysqld(_Z14open_table_defP3THDP11TABLE_SHAREj+0x1822)[0x82213c2]
/usr/libexec/mysqld(_Z15get_table_shareP3THDP10TABLE_LISTPcjjPij+0x197)[0x8169869]
/usr/libexec/mysqld(_Z10open_tableP3THDP10TABLE_LISTP11st_mem_rootP18Open_table_context+0x545)[0x817010a]
/usr/libexec/mysqld(_Z11open_tablesP3THDPP10TABLE_LISTPjjP19Prelocking_strategy+0x456)[0x8171683]
/usr/libexec/mysqld(_Z20open_and_lock_tablesP3THDP10TABLE_LISTbjP19Prelocking_strategy+0x54)[0x8171f86]
/usr/libexec/mysqld[0x81adf41]
/usr/libexec/mysqld(_Z11plugin_initPiPPci+0x8dc)[0x81b0db9]
/usr/libexec/mysqld[0x8133a34]
/usr/libexec/mysqld(_Z11mysqld_mainiPPc+0x42a)[0x8136cc8]
/usr/libexec/mysqld(main+0x27)[0x812ce33]
/lib/i686/nosegneg/libc.so.6(__libc_start_main+0xe6)[0xb7288ce6]
/usr/libexec/mysqld[0x812cd95]

Trying to get some variables.
Some pointers may be invalid and cause the dump to abort.
Query (0): is an invalid pointer
Connection ID (thread ID): 0
Status: NOT_KILLED

The manual page at http://dev.mysql.com/doc/mysql/en/crashing.html contains
information that should help you find out what is causing the crash.
120525 06:54:11 mysqld_safe mysqld from pid file /var/run/mysqld/mysqld.pid ended
I tried everything I could, for about 90 minutes. Then I gave up and purged the entire MySQL installation and installed it again. Viola! It started fine! Then it was only a matter of taking the latest database backup and putting it back.

Friday, February 10, 2012

SCORP Robot

Today, robots are used for variety of actions, and if you’re looking for a surveillance robot, today we have a robot that comes from privately owned Swiss company.

 Micro Unmanned Ground vehicle is based on SCORP platform, and according to Novatiq, this surveillance robot is lightweight, so you can easily put it in your backpack. As for dimensions, SCORP robot is 4cm (13”) long, 27cm (10”) wide, and 12cm (4.7”) high with it weighs 3.5kg (7.7 pounds).


This robot features four different cameras, so user can see in all directions, and thanks to the IR illuminators, you can easily use this robot for night surveillance. SCORP robot can be remotely controlled from up to 500m (1,650 feet) and it can achieve speed of 8km/h (5mph), and thanks to the built-in battery, it can work for 2 hours, but you can also add an external battery.

 n addition to external battery, there are varieties of additions such as robotic arm, biochemical detector, firing explosive charges, and many more.

 SCORP robot is great for surveillance, and it should become available in March for $11,447.


Flygrip

There is variety of accessories for your smartphone on the market, but if you’re looking for an accessory that can keep your smartphone safe, you might be interested in this latest accessory called Flygrip.


Dropping your smartphone is always a problem, especially if you don’t have rugged case that will protect it from damage, but luckily for you, there’s a Flygrip that should keep you from dropping your smartphone. If you usually use your smartphone with one hand, than you know that you can easily drop it and cause potential damage, but thanks to the Flygrip attachment that attaches to your smartphone, you should have a firm grip on your smartphone, even if you’re holding it with one hand. After you’ve attached Flygrip to your smartphone, you just need to slide your fingers into the “grip”, and you should have somewhat a better hold on your phone.

Flygrip is available in small, medium and large sizes, depending on the size of your fingers, and in regards to the price, each Flygrip costs $29.95.

Thursday, December 29, 2011

Windows 8 brings password management and synchronization

We all know that Windows 8 will offer a variety of features, and regarding the upcoming features, we’re pleased to inform you that Windows 8 will have an improved password management system.


You probably use a variety of passwords on your computer, so it’s not uncommon that you lose or forget your password, and the only solution for that problem is to request a new password, but that can be a tedious process sometimes. Luckily for you, Windows 8 will try to eliminate this problem with enhanced password storage and syncing feature. By logging in to Windows 8 with your Live ID, you’ll automatically retrieve passwords that you’ve used on this computer, and all your website passwords will be saved on Internet Explorer 10, so you won’t have to log in again. However, if you need to see those passwords, you can do so easily right from the credential manager.

Password storage and synchronizing feature sounds promising, however it has it flaws, but we can’t wait to see how it works in action.

Source: http://www.gadgetlite.com/2011/12/28/windows-8-brings-password-management/

Unboxing Samsung Galaxy Note Android smartphone

We were fortunate to have been sent the Samsung Galaxy Note (GT-N7000) just before the Christmas holidays began and whilst we’ve been keeping our mouths full of mince pies, chocolate and mulled wine we’ve also taken some time to unbox and capture a quick gallery.


Is it a tablet or is it a smartphone? Difficult to say and we’ve seen mixed reviews regarding its 5.3″ front panel. While we continue to test out the Galaxy Note, here’s a quick summary of its key specs.
  •     Android 2.3 Gingerbread OS
  •     Dual-core 1.4GHz Cortex A9 processor
  •     5.3-inch HD Super AMOLED screen
  •     8 megapixel main camera capable of recording 1080p videos, and a 2-megapixel front-facing camera
  •     802.11 b/g/n, bluetooth 3.0
  •     HSPA+ 21Mbps 850/900/1900/2100
  •     a-GPS and GLONASS systems
  •     Accelerometer, gyro, proximity, compass, barometer
Source: http://www.gadgetlite.com/2011/12/26/gallery-unboxing-samsung-galaxy/

SMK-Link Bluetooth Calculator Keypad combines keypad and calculator into one

Using your Mac with compact-size keyboard saves your space, but it also deprives you from your keypad, but luckily for you, we have a device that will give you back your keypad functionality.

Bluetooth Calculator Keypad comes from SMK-Link, and this keyboard gives you quick access to numerical and mathematical keys. Besides its keypad functionality, Bluetooth Calculator Keypad can also work as a calculator, so you don’t have to start any additional calculator applications on your computer. There are also buttons for specific functions such as memory recall, percentages, and decimal change, so you’ll be able to do perform basic calculations with ease.

If you’re looking for a keypad for your Mac, Bluetooth Calculator Keypad might be perfect for you, because it comes with built-in calculator as well, and it’s fully compatible with both Mac and PC computers. As for the price, Bluetooth Calculator Keypad can be purchased from Apple Online Store for $59.99.

Source: http://www.gadgetlite.com/2011/12/28/smk-link-bluetooth-calculator/#more-32800

Page Rank

Check Page Rank of your Web site pages instantly:

This page rank checking tool is powered by Page Rank Checker service

Facebook

Followers